LUX BOARD--Under floor heating
LUX thermal tilebacker boards are well suited to underfloor and under tile heating applications. Offering excellent thermal properties, high density and moisture proof. Installed below underfloor heating cables or mats on an existing un-insulated concrete or timber floor they will greatly reduce warmup time and subsequent running costs.
LUX thermal tilebacker board is an advanced product which saves you money by preventing heat loss into concrete floors. LUX thermal tilebacker board is ideal for use with under-tile heating systems and being 100% waterproof is ideal for wetrooms etc.
When LUX Boards are used, most of the heat created by the heating element is reflected upwards, and you will find that after switching on your heating, the floor will warm up much quicker.
Benefits of using LUX board for floor heating:
1. Acts as a thermal barrier and significantly reduces heat loss to the substrate.
2. Transforms undertile heating into a very responsive and efficient system.
3. After switching on your heating, your floor tiles will warm up in about 15-20 minutes, even on a cold concrete floor.
4. On a wooden floor, it has a 2 degree increase every 10 minutes from start up.
5. Ideal for use in wet areas, showers and bathrooms. Shows excellent acoustic properties particularly in reducing footfall noise and the echo often associated with large tiled areas. LUX Insulation boards can reduce sound by 20 decibels.
6. Can replace tile and slate underlay, providing the sub-floor is structurally sound and flat.
7. The boards are supplied in thicknesses ranging from 6mm - 50mm depending on floor thresholds and your budge.
Advantages:
Reduces Your Carbon Footprint – Our insulation boards enable your Heat Mat system to run more efficiently reducing your energy usage and running costs.
High Thermal Insulation – The core is composed of extruded polystyrene which is one of the LUX thermal insulating materials available.
Waterproof – It will not warp, swell or decay in contact with water there by ensuring the tiles remain in place.
Compressive Strength– Sheer Load Up to 30 tonnes/m2 ( 60kg/m2)
Lightweight – An advantage over plywood, plasterboard and “cement-type” backer board is that our board is very light. This makes installation an easy one-man job.
Soundproof Properties – Impact Sound reduction.
Ready to Receive Tiles/Plaster – No priming is needed.
It Pays For Itself – By reducing the running costs of your Heat Mat system the 10mm boards can pay for themselves in as little as 3 years, if used on a poorly insulated floor base.
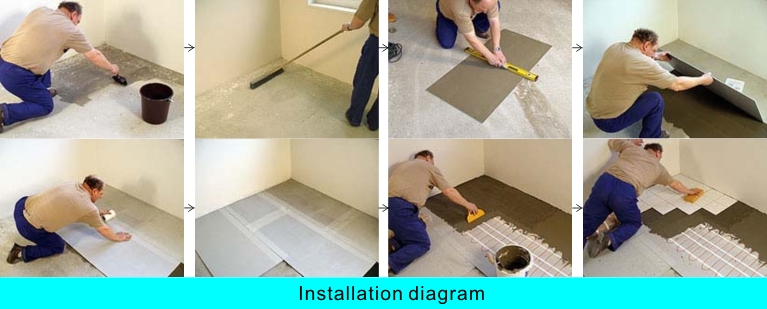
Fixing Instructions: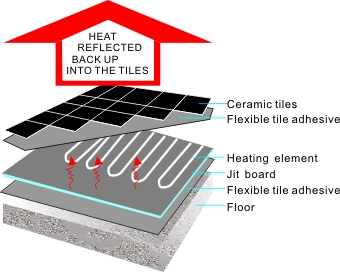 Fixing to Wooden Floors
By Adhesive
Our boards can be laid onto a level floor, with a suitable flexible rapid set cementitious tile adhesive – solvent based or ready mixed adhesives MUST NOT be used. Boards should be thoroughly bedded and laid in a chequer plate fashion, like bonding brickwork, making sure that there are no gaps between the boards.
By Mechanical Fixing
Our boards should be fixed to a secured wooden base using approximately 12 screws per 1250mm x 600mm boardat 300mm centers; a 35mm fixing washer should be used under each screw head and the screw tightened until thewasher bites into the board to provide a firm hold.The length screw should be used to allow it to pass through the board and into the wooden base beneath. The boards should belaid in a checker plate fashion.
The base should be checked to ensure there are NO electrical cables or pipework beneath that may be damaged by the screws when affixing the boards.
(Please note that 6mm boards are not suitable for use with mechanical fixings)
Fixing to Concrete Floors
Prior to the fixing of LUX Boards, all traces of loose material should be removed back to the concrete substrate. The floor should be level and dust free. New concrete or screed should be correctly cured prior to the fixing of LUX board. Seal the floor with a suitable primer. A suitable flexible rapid set cementitious tile adhesive should be used – solvent based adhesives or ready mixed adhesives MUST NOT be used. Apply the bed of adhesive to the floor using a 8mm square notched trowel. Boards should be thoroughly bedded and laid in a chequer plate fashion, like bonding brickwork, making sure that there are no gaps between the boards. Any slight depressions in the concrete floor will normally be taken up with the thickness of the adhesive. Boards should be thoroughly bedded, ensuring that no voids remain beneath them.
Before installing your underfloor heating system
Before starting to install your underfloor heating system you must tape all joins between the boards with self-adhesive reinforcing tape.
After the tape has been laid you should prime the boards with a primer suitable for use with the tile adhesive or levelling compound you have chosen.
Installing heating mats/cables and floor tiles
Proceed to lay the mats and floor tiles in the standard way that is described in the supplier instructions for use heating mats and cables. It is not necessary to first penetrate the foundation boards, as LUX boards stick very well to the cement adhesive materials even without the penetration coat.